

How To Change Water Filter In Whirlpool Fridge
Your model number may be located in a variety of locations:
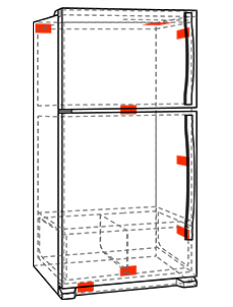
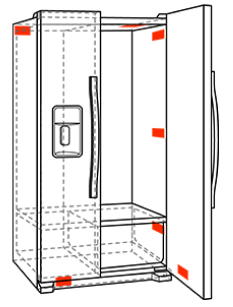
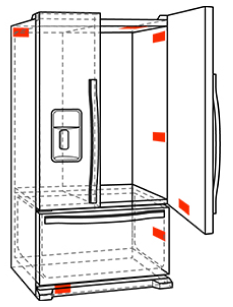
Places to look:
- Ceiling of refrigerator interior
- Inside walls of refrigerator or freezer (possibly behind drawers)
- Frame behind the door when the door is opened
- Behind the kickplate
- On the back of the refrigerator
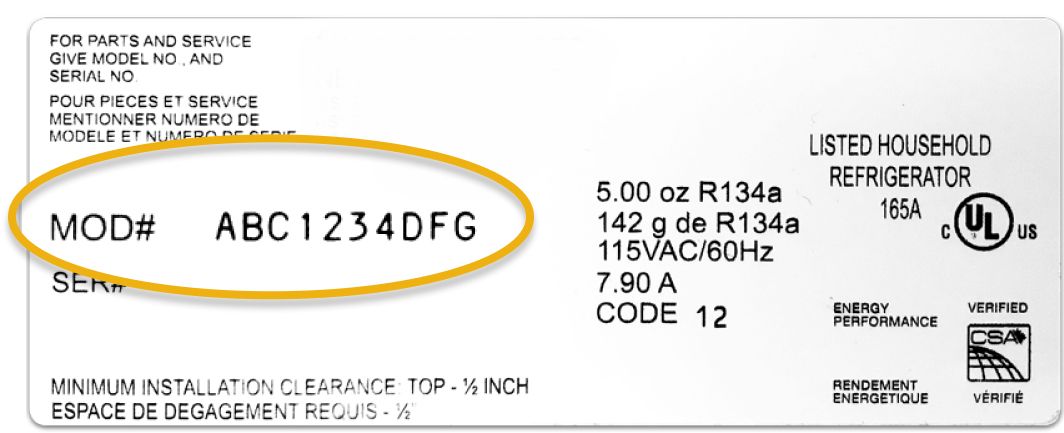
A sample model number label looks like this:
Your refrigerator water filter works hard to keep your drinking water clean and tasting fresh. In order to keep it that way, it needs to be routinely changed—we recommend once about every six months. It's easy to locate your filter and replace it with a fresh one. Keep reading to learn how to easily find and replace your Whirlpool® refrigerator water filter.
Finding and replacing your fridge filter
Before you can replace your refrigerator water filter, you need to know what you have. Look for the number printed on it or find the approved water filter for your Whirlpool® refrigerator.
Care tip: Once you know your filter type, consider purchasing a subscription to automatically ship a replacement filter every three or six months.
Select your water filter
Choose your filter from the products listed below to follow simple replacement steps or watch a video on how to change your Whirlpool® refrigerator water filter.
Filter 1: Step-by-step instructions
- Locate your water filter cover in the upper right-hand corner inside your refrigerator or in the base grille.
- Lift the filter door up.
- Pull the filter out and discard it.
- Open your new filter and remove the protective coverings from the O-rings. Make sure the O-rings are still in place after the cover has been removed.
- When inserting the new filter into the slot, make sure the arrow is pointing upward. Do not force the water filter. If it does not slide in easily, rotate it until the notches are properly aligned with the grooves.
- Push the filter door closed so it snaps into place.
- Once your filter is replaced, run four gallons of water through the line to properly flush the new filter.
Filter 2: Step-by-step instructions
- Locate your water filter cover in the upper right-hand corner inside the refrigerator.
- Pull open the filter door.
- Pull the filter so it's angled down, turn it to the left and pull. Discard the old filter.
- Open your new filter and remove the protective coverings from the O-rings. Make sure the O-rings are still in place after the cover has been removed.
- When inserting the new filter into the filter slot, make sure the arrow is pointing upward. As you push in, the filter will begin to rotate.
- Turn the filter clockwise until it locks.
- Push the filter door closed so it snaps into place.
- Once your filter is replaced, run four gallons of water through the line to properly flush the new filter.
Filter 3: Step-by-step instructions
- Locate your water filter cover on the left side of the refrigerator's base grille.
- Push the eject button to release the filter.
- Pull the filter out and discard it.
- Open your new filter and remove the protective coverings from the O-rings. Be sure the O-rings are still in place after the cover has been removed.
- Place the filter cap on the new cartridge so the ridges align. Turn the cap clockwise to lock into place.
- When inserting the new filter into the slot, make sure the arrow is pointing to the left.
- Push the filter in until the eject button pops back out.
- Once your filter is replaced, run four gallons of water through the line to properly flush the new filter.
Filter 4: Step-by-step instructions
- Locate your water filter cover in the upper right-hand corner of your refrigerator interior.
- If the filter tab in your refrigerator is facing outward, push on it and pull the cover down. If the tab is on the bottom of the cover, pull forward and down on the small lever to open the cover.
- Turn the filter to the left and pull. Discard the old filter.
- If this is a first-time installation, you'll find a cap inside the filter slot. Turn it counterclockwise and pull it out.
- To insert the new filter in the slot, line it up with the grooves, push in and turn it to the right.
- Push up on the filter to lock in place.
- Push the filter door up so that it snaps closed.
- Once your filter is replaced, run four gallons of water through the line to properly flush the new filter.
Need your model number?
Whirlpool® refrigerators display their model number information in different locations. Consult our guide to find yours.
More cleaning tips and tricks

Appliance IQ
Want more answers to your kitchen and laundry questions?
Was this article helpful? Pass it on
Item added to the compare list, you can find it at the end of this page
How To Change Water Filter In Whirlpool Fridge
Source: https://www.whirlpool.com/blog/kitchen/how-to-replace-refrigerator-water-filters.html
Posted by: scherrwarst1961.blogspot.com
0 Response to "How To Change Water Filter In Whirlpool Fridge"
Post a Comment